How to install a Butyl Pond Liners
Preparing the ground

Laying a pond liner is a big stage in the construction of a pond. Pond liners are commonly either preformed, which are rigid, or Butyl, which is a flexible material liner. If you intend to line the pond with Butyl as compared to a rigid preformed liner, thorough preparation of the ground is really important. Although Butyl Pond liner is tough, it can be punctured.
The weight of water creates pressure on the liner and if the liner gets breached or holed in the future, it creates a massive problem of a leaking pond. A pond leak is very time-consuming to fix and involves draining the pond down the leak level and fixing. If the pond is full of wildlife and mature plants, this is no easy task.
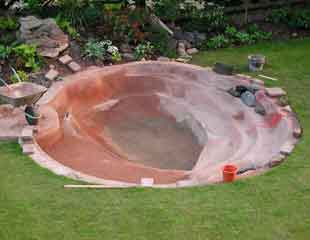
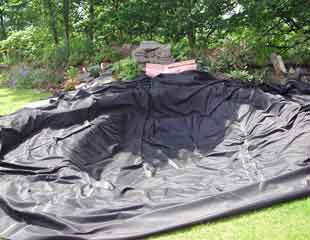
To minimise the risk of a puncture to the liner, the starting point is to remove all stones and sharp objects. Then, as an extra precautionary step, it is a good idea to line the area before laying the Butyl liner with a specially made protective fleece to preserve and prolong the life of the liner. The ponds illustrated in the images were built in ground that was very rocky, which required extra work and attention when installing the Butyl liner. If you have soft sandy ground, this will not be essential; rocky flinty ground, you may want to consider a soft liner before the Butyl to give extra protection.
For a long-lasting pond you can also cement in the shell once the hole has been dug, levelled and shaped as in the image. Whether you take this step will depend on the ground in which you are constructing the pond. In the image, the ground was flinty and it was not possible to shape the soil to the degree that was needed for the planting shelves. Rocky ground doesn't really hold a shape well so it was better to cement it. On these pages are ideas for building a pond, but it will, as always, depend on the ground as to what work is needed; some soil is easier.
Installing a Butyl liner

Butyl liner is flexible and can be formed to the shape of your pond. It is quite heavy and, if possible, it is best laid out on a warm day as the heat makes it more flexible and malleable . Start from the centre and lay the liner outwards. The aim is to get it as flat as possible and run it up to the top of the pond and just over onto the ground, bearing in mind the need to hide the liner to ensure the finished result looks professional.
Preformed liners are made of plastic or glass fibre and are rigid, long lasting and need to be fitted exactly into the hole and level.
For all ponds being level is crucial: it is worth spending time levelling the pond because if you fill up the pond at the end stage, and it is not level, it will show. Water will find the level and it will look odd. A spirit level needs to be used to check the pond at the bottom and at all points to ensure it is 100% level before fitting the liner.
A butyl liner needs to be laid from the centre of the pond outwards, pleating carefully on shelves to get the liner as flat as possible.
Retailer web sites explain how to calculate the size of pond liner needed for your intended pond. Liner is expensive as are any mistakes if there are miscalculations. Good retailers will assist in the calculation if you call them with the pond dimensions.
Fill the pond before trimming off the liner. Use bricks along the rim to hold it in pace and then fill, settle and then trim off surplus, leaving an overhang which will need to be disguised with plants and stones.
You are then ready to fill up the pond with water. Initially, for a short while, it will be clear and then turn green. It will take time for the natural balance of the ecosystem in the pond to return the water to clear. Although in the first instance, the only practical way to fill the pond is to use tap water, if possible after the initial fill top from a water butt, which will utilise natural rainwater.
See also
